Technically, it is better to perform the test on an empty bladder and with the patient in a lithotomy or semi-sitting position, as in a gynaecological examination (or simply bending her legs on the examination table).
It is important to achieve a relaxed atmosphere in the examination room, given that if the patient is too tense, it is difficult to obtain a correct Valsalva manoeuvre or contraction.
Image optimization
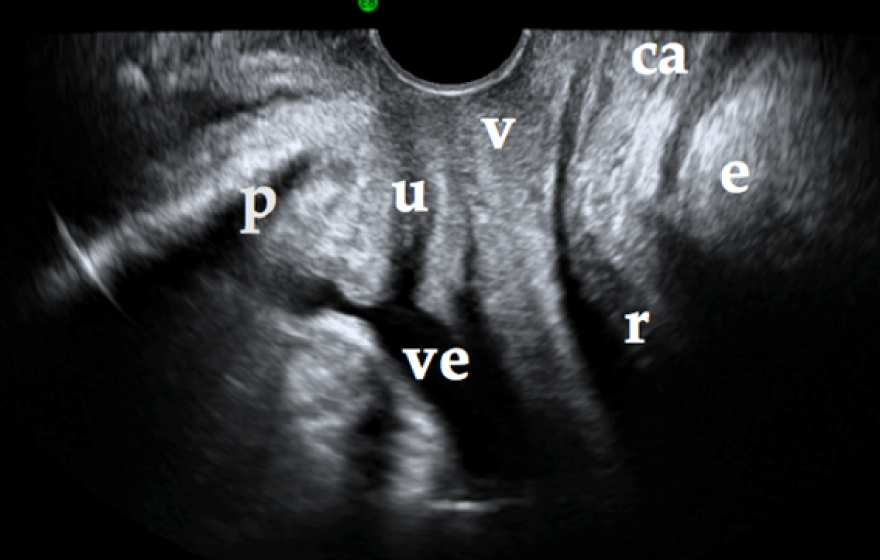
For ultrasonographic assessment, the two-dimensional cross section reference must be obtained with total clarity in order to proceed with the three-dimensional study. This reference plane is obtained in the sagittal and median plane. It must include the pubic symphysis, the urethra, the bladder, the vagina, the anal canal, the rectum and the lowermost part of the levator ani muscle. In order to see this cross section, we do not insert the probe; instead, for the transperineal probe, we simply place it on the perineum between the labia majora; in the case of the introital probe, we place it under the urethra (Figure 1).
The two-dimensional cross section must include: the pubic symphysis (p), the urethra (u), the bladder (ve), the vagina (v), the anal canal (ac), the rectum (r) and the lowermost part of the levator ani muscle (e).
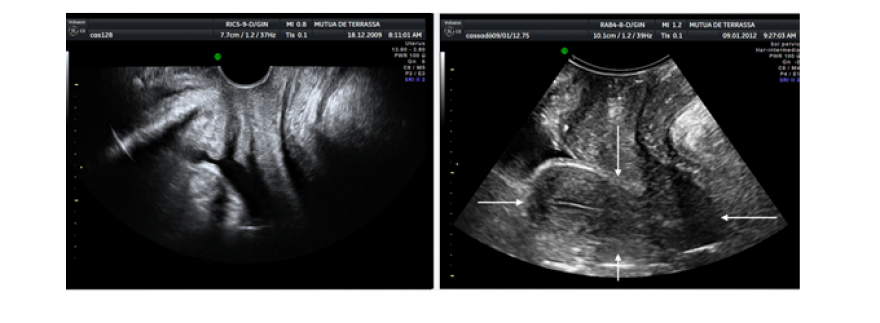
If we compare the transperineal probe with the introital probe, we will see that the introital probe's depth of field is smaller than that of the transperineal one. That is to say, the introital ultrsound allows us to see the structures close to the transducer very well but with more difficulty at greater depth; on the other hand, the transperineal ultrasound loses some definition at close range but allows for much better viewing of the structures that are farthest away. Thus, if we were to assess anti-incontinence meshes, for example, the introital ultrasound would provide us with a very good image of the mesh that was in contact with the transducer. On the contrary, if we were to assess a prolapse, the transperineal ultrasound would work much better; not only would it allow us to better see the structures descending through the vagina, but it would also prevent the prolapsed structures from displacing the transducer (as is often the case with the introital ultrasound).
Figure 2. Imaging with an introital probe on the left and with a transperineal probe on the right. In the image on the right, the uterus (marked with arrows) is visualized; it is however not visualized in the image on the left due to the smaller depth of field of the introital probe
Present-day ultrasound machines can greatly improve the image by adjusting the harmonics frequency, the gain, the smoothness of the image, etc.
Another important aspect is the orientation of the probe. This tends to be a common mistake for novices. When we can’t obtain the previously mentioned reference plane, the transducer is most likely upside down.
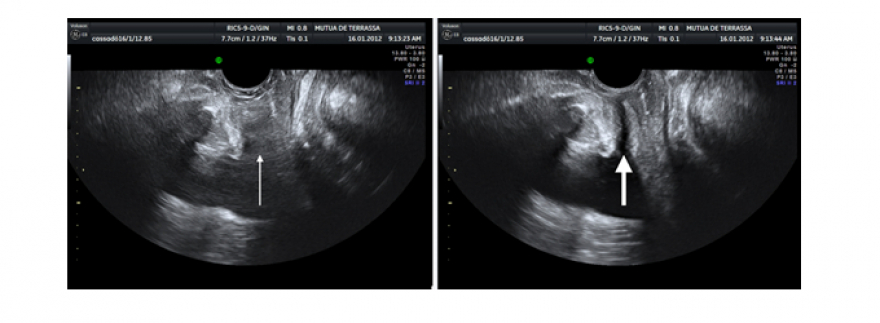
We must avoid gas, as it is the enemy of ultrasound scans. Gas can cause false images of pathologies and lead to the diagnosis of injuries that do not really exist, such as a false diagnosis of a levator ani injury. For this reason, attempts have been made to try to minimize the percentage of false images (1). It is important to sheathe the transducer correctly in order to avoid any bubbles between the sleeve and the device. Physiological gas (for example in the rectal ampulla) is more difficult to control, but if the ultrasound view isn’t correct, it may be necessary to reschedule with the patient, having her prepare with an enema before the following appointment (Figure 3).
Figure 3. The thin arrow on the left indicates the place where we should see the urethra; however, it is not visible due to gas in the probe cover. In the image on the right, we can see the urethra (marked with the thick arrow) once we have removed the gas
It is also important to avoid the iatrogenic adjustment that the transducer can produce. This can be easily monitored by looking at the image: one must obtain a plane in which the only contact is with the transducer and the displayed structure is not distorted. This is especially pertinent when assessing urethral mobility: if we compress the urethra, we cannot properly assess its mobility (Clip 1).
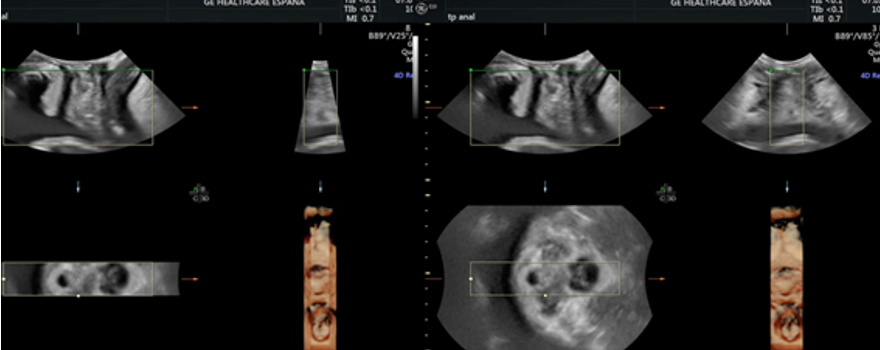
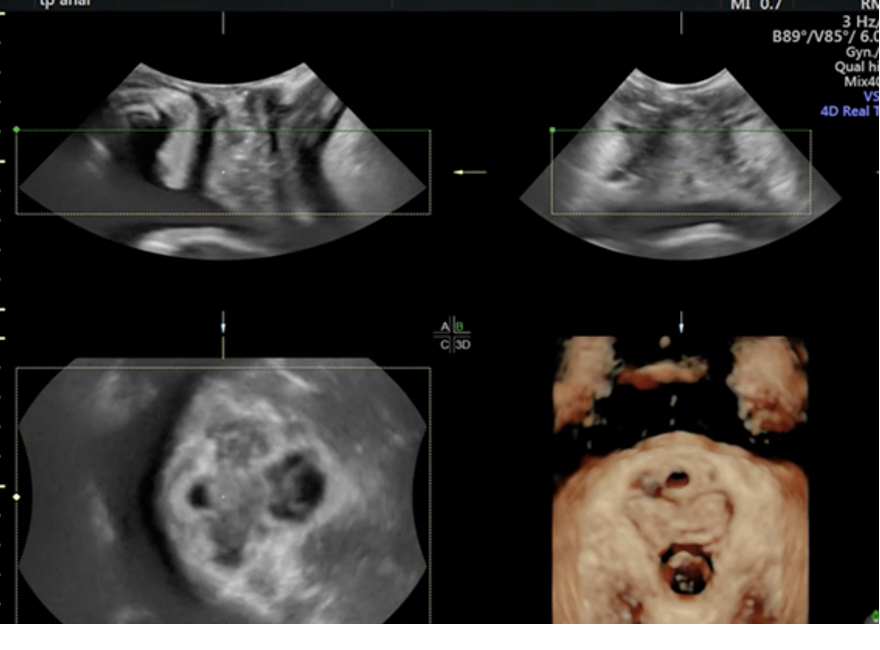
As for obtaining three-dimensional images, we must previously increase the angles of incidence in order to be able to see the entire urogenital hiatus (Figure 4). We must keep in mind that the reconstructed, or rendered, image (the three-dimensional image) is configured using the image inside a rectangle that appears in both the sagittal, transverse and axial planes. The dimensions of this rectangle, or ROI (region of interest), can be modified to include the area that we want to study (Figure 5).
Figure 4. Opening the angles of incidence in order to be able to see the whole axial plane, as shown in the image on the right
Figure 5. Expansion of the ROI window in the sagittal and transverse plane in order to see the volumetric image of the hiatus shown below and to the right
We can also modify the direction with which we see the structures the ROI contains. It's important that we choose the "top-to-bottom" direction (with the green line at the top – this line indicates the window in which we are looking at the ROI content) in the sagittal plane so that we can correctly understand the reconstruction of the urogenital hiatus. Clip 2 shows how the rendered or volumetric image changes once the ROI direction is set correctly. Ultrasound machine software also allows for improving the obtained three-dimensional image. But a poor 2-D image will never improve in a 3-D view. The volume obtained from the two-dimensional image must be good in order for the three-dimensional image to make sense.
Some authors have studied the learning curve necessary for analysing pelvic floor dysfunctions using ultrasound. Between 10-20 women is considered the correct number for this type of analysis. (2)
We need to have very precise anatomical knowledge in order to perform a pelvic floor ultrasound, as well as significant knowledge of the tool that we have in hand – with all the technological possibilities that the ultrasound machine provides us. In addition, we must follow a precise procedure for this type of examination, so as not to forget any of the elements that must be assessed. We must know how to interpret images within their context. The clinical aspect is therefore very important in the assessment of the images: we are not treating images; we are treating a dysfunction supplemented by an image. Due to the possibility of false images, we must always raise a reasonable doubt about what we are seeing. If we are systematic in our examination, then we will be able to minimize this reasonable doubt.
Examination procedure
The examination procedure is as follows:
We must assess the amount of post-void residual urine. To measure this, it is important to look at the entire urethra. We will see the urine, which is anechogenic, inside the urinary bladder. Depending on the formula used, we will measure the anechogenic content in both the sagittal plane and the transverse plane. In the sagittal plane, in order to correctly define the limits of measurement, the acoustic shadow that the pubic symphysis provokes must be avoided. In other words, we must attempt to focus on the middle part of the pubis, which – due to its cartilaginous composition – does not provoke a posterior acoustic shadow. We thereby ensure that we set the measurement in the centre of the bladder, since we'll be able to see the entire urethra.
We assess the bladder wall, measuring its thickness and checking for any endocavitary injury.
We visualize the urethra to attempt to assess both its mobility as well as the thickness of the urethral sphincter and the presence of funnelling, with stress, at the opening of the bladder neck.
We assess the prolapsed structures. In order to assess these structures, we usually use the transperineal probe, given that the introital probe is very small and would be pushed out by the prolapsed structures. We check for cystocele in the anterior compartment of the pelvic floor; we examine the uterine prolapse in the middle compartment; and we look for the presence of rectocele, enterocele or a combination of both in the posterior compartment.
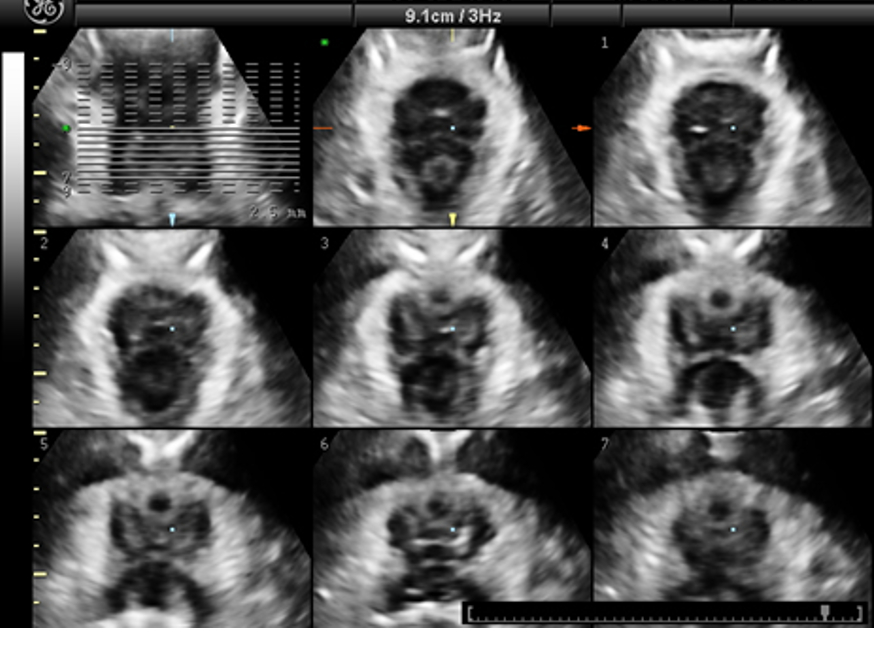
We examine the levator ani muscle. This muscle comprises the urogenital hiatus. The assessment of the urogenital hiatus is conducted in the smallest possible area – that is, in the area where the pubic symphysis is closest to the anorectal angle. We assess the levator ani muscle during contraction in order to check for injury, while the assessment of the urogenital hiatus area is performed using the Valsalva manoeuvre. We use tomographic ultrasound imaging (TUI) – which consists of tomographic slices of an ultrasonographic volume – in order to help us examine a levator ani injury. It is important to assess the three central slices, 2.5 mm apart. In order to diagnose an avulsion or levator ani injury, these three central slices must be affected (3). For the central slices, we use the pubic symphysis as our reference in order to standardize the technique; in other words, in the upper part, we see that the pubic symphysis is open in the left-most slice, is closing in the central slice and is closed in the right-most slice (Figure 6). In turn, when performing the Valsalva manoeuvre, we can measure the area of the urogenital hiatus in the rendered image.
Figure 6. TUI slices that show a completely normal levator ani
6. We must also assess the anal sphincter complex. The anal sphincter has an anatomical peculiarity in that it is not a perfect cylinder. The internal anal sphincter therefore extends further than the external anal sphincter. The upper lower part of the external anal sphincter connects with the puborectal muscle. Using TUI, we can also assess the integrity, or lack thereof, of both sphincters.
7. Lastly, if the patient was operated on with an anti-incontinence or prolapse mesh, the mesh can be assessed by ultrasound, since the material is hyperechogenic and therefore easily identifiable. Three-dimensional reconstruction allows us to rotate the volumes and see, with great precision, the types of mesh employed and their trajectory, symmetry, and relationship with adjacent structures, etc.
Once we have finished, we create a report in which we present all of our ultrasound findings.
BIBLIOGRAPHY
Cassadó Garriga J, Quintas Marques L, Pessarrodona Isern A, López Quesada E, Rodriguez Carballeira M, Badia Carrasco A. Can 3D Power Doppler identify levator ani vascularization at its pubic insertion?. Int Urogynecol J 2015;26:1327-32.
Siafarikas F, Staer-Jensen J, Braekken IH, Bø K, Engh ME. Learning process for performing and analyzing 3D/4D transperineal ultrasound imaging and interobserver reliability study. Ultrasound Obstet Gynecol. 2013;41:312-317.
Dietz HP, Bernardo MJ, Kirby A, Shek KL. Minimal criteria for the diagnosis of avulsion of the puborectalis muscle by tomographic ultrasound. Int Urogynecol J. 2011;22:699–704